
AWS에서는 Kubernetes에 역할을 해주는 EKS를 구성하고자합니다. EKS에는 Cluster(컨트롤 플레인)과 Pod를 생성해줄 Node가 필요합니다. Node Group 유형은 2가지 입니다. manageNodeGroup과 NodeGroup 유형이 있습니다. 먼저 사용자는 둘에 차이점을 파악하는 것이 우선적이며, 각 NodeGroup에서 생성되는 Cluster 및 Node들은 필요한 권한을 부여하도록 해야합니다.
Cluster Role Create(EKS - Cluster 유형)
1. Role

2. Cloudwatch Metrics 인라인 정책
{
    "Version": "2012-10-17",
    "Statement": [
        {
            "Action": [
                "cloudwatch:PutMetricData"
            ],
            "Resource": "*",
            "Effect": "Allow"
        }
    ]
}3. PolicyELBPermissions
{
    "Version": "2012-10-17",
    "Statement": [
        {
            "Action": [
                "ec2:DescribeAccountAttributes",
                "ec2:DescribeAddresses",
                "ec2:DescribeInternetGateways"
            ],
            "Resource": "*",
            "Effect": "Allow"
        }
    ]
}WorkerNode Role Create(EC2 유형)
1. Role
2. AutoScaler
{
    "Version": "2012-10-17",
    "Statement": [
        {
            "Effect": "Allow",
            "Action": [
                "autoscaling:DescribeAutoScalingGroups",
                "autoscaling:DescribeAutoScalingInstances",
                "autoscaling:DescribeLaunchConfigurations",
                "autoscaling:DescribeTags",
                "autoscaling:SetDesiredCapacity",
                "autoscaling:TerminateInstanceInAutoScalingGroup",
                "ec2:DescribeLaunchTemplateVersions"
            ],
            "Resource": "*"
        }
    ]
}Bastion 설정
1. Bastion Instance Root 계정으로 변환(문제에서 EKS에 모든 Object는 Root 계정으로 접근이 가능합니다! 라고 나오면 무조건 aws configure 명령을 한 후 생성해줘야한다. 그럼 EKS 서비스는 “아 날 생성자는 Root 이구나!” 라는 것을 인식가능합니다.)
aws configure -> Root 계정의 자격증명을 부여합니다.2. Create Cluster And NodeGroup
- ManageNodeGroup > 추천합니다.
cat << EOF > cluster.yaml
apiVersion: eksctl.io/v1alpha5
kind: ClusterConfig

metadata:
    name: wsi-eks-cluster
    region: ap-northeast-2
    version: "1.22"
vpc:
  subnets:
    public:
        ap-northeast-2a: { id: subnet-05a42db2a93a9c392 }
        ap-northeast-2b: { id: subnet-0ef47cdb576fe9652 }
    private:
        ap-northeast-2a: { id: subnet-0e33694ad3300346b }
        ap-northeast-2b: { id: subnet-069692d3fccacfce4 }
iam:
	serviceRoleARN: "arn:aws:iam::AccountID:role/EKS-ControlPlane-Role"
managedNodeGroups:
  - name: wsi-manage-nodegroup
    instanceType: t3.medium
	ami: ami-028f26a5a0798bf1e #Amazon Linux
	labels: { worker1: front } #Label 추가
    desiredCapacity: 2 #Node 갯수
    volumeSize: 80 #EBS 볼륨 크기
    privateNetworking: true #Private 네트워킹 설정
    iam:
      withAddonPolicies:
        imageBuilder: true # Amazon ECR에 대한 권한 추가
        albIngress: true # albIngress에 대한 권한 추가
        cloudWatch: true # cloudWatch에 대한 권한 추가
        autoScaler: true # auto scaling에 대한 권한 추가
    ssh: #SSH 접근 가능하도록 구성
      publicKeyName: worldskillskey1 #AWS 서비스에 KeyPair 존재해야함

  - name: wsi-manage-nodegroup2
    instanceType: t3.medium
	ami: ami-028f26a5a0798bf1e #Amazon Linux
	labels: { worker2: backend }
    desiredCapacity: 2
    maxSize: 4
    volumeSize: 80
    privateNetworking: true
    tags:
      wsi-name: wsi-nodegroups-backend
    iam:
      withAddonPolicies:
        imageBuilder: true
        albIngress: true
        cloudWatch: true
        autoScaler: true
    ssh:
      publicKeyName: worldskillskey1
 EOF

 #실행
eksctl create cluster -f cluster.yaml- 자체 Node 생성 > 비 추천
cat << EOF > cluster.yaml
apiVersion: eksctl.io/v1alpha5
kind: ClusterConfig

metadata:
    name: wsi-eks-cluster
    region: ap-northeast-2
    version: "1.22"
vpc:
    subnets:
        public:
            ap-northeast-a: { id: subnet-05a42db2a93a9c392 }
            ap-northeast-b: { id: subnet-0ef47cdb576fe9652 }
        private:
            ap-northeast-2a: { id: subnet-0e33694ad3300346b }
            ap-northeast-2b: { id: subnet-069692d3fccacfce4 }
iam:
	serviceRoleARN: "arn:aws:iam::680360122082:role/EKS-ControlPlane-Role"

nodeGroups:
  - name: workernode1
    labels: { role: eksWorkerNodeRole }
	iam:
		instanceRoleARN: "arn:aws:iam::AccountID:role/eksWorkerNodeRole"
    instanceType: t3.small
	availabilityZones: ["ap-northeast-2a", "ap-northeast-2b"]
    minSize: 2
    desiredCapacity: 2
    maxSize: 4
    volumeSize: 80
    privateNetworking: true

  - name: workernode2
    labels: { role: eksWorkerNodeRole }
	iam:
		instanceRoleARN: "arn:aws:iam::AccountID:role/eksWorkerNodeRole"
	availabilityZones: ["ap-northeast-2a", "ap-northeast-2b"]
    instanceType: t3.small
    minSize: 2
    desiredCapacity: 2
    maxSize: 4
    volumeSize: 80
    privateNetworking: true
EOF

#실행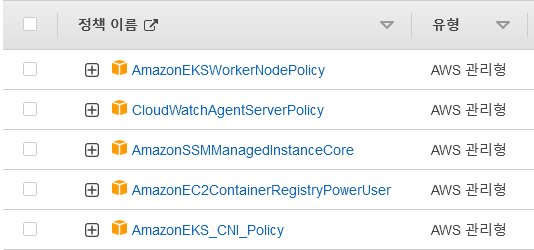
eksctl create cluster -f cluster.yaml- IAM을 부여할 수 있는 방법은 2가지가 있습니다. 먼저 첫번째는 생성하면서 Addon을 사용하는 방법과 두번쨰는 Console에서 미리 생성 후 Cluster, Node 생성 과정에서 Attach하는 방법입니다.
#편하신대로 사용하시면 됩니다!!
1. Addon 사용
 iam:
      withAddonPolicies:
        imageBuilder: true
        albIngress: true
        cloudWatch: true
        autoScaler: true


2. 자체 Role 사용
iam:
instanceRoleARN: "arn:aws:iam::680360122082:role/eksWorkerNodeRole"EKS Cluster 생성 후 사용자에 맞춰서 네트워킹 설정
1. Public and Private
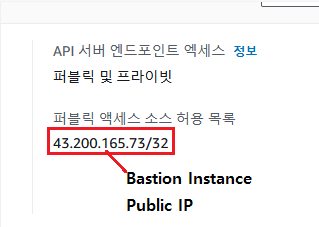
2. Private Any(VPC 내에서 밖에 접근하지 못합니다.)

3. 설정이 완료되면 Cluster에 보안그룹을 수정해야합니다.

꼭 해주어야 합니다. 저렇게 위에 Bastion Instance Public IP를 지정해주면 Bastion Instance에서만 Private 접근이 가능합니다. 그리고 꼭 EKS 클러스터를 처음 생성할때에는 위에 파일을 사용합니다. 즉, Cluster가 완전히 생성된 후 수정해주어합니다.
API Server 통신 테스트
1. API Server Endpoint 확인
kubectl config view -o jsonpath='{"Cluster name\tServer\n"}{range .clusters[*]}{.name}{"\t"}{.cluster.server}{"\n"}{end}'
2. telnet으로 접근 확인
sudo yum install telnet
echo exit | telnet [[API Server Endpoint]] 443
3. nslookup 사용하기
nslookup [[APISERVER endpoint]]
NodeGroup Name Update(ManageNodeGroup을 예로 하겠습니다.)
해주는 이유는요! 이제 eksctl 명령을 사용해서 Node를 생성하면 자동으로 eksctl-clusterName-Nodegroup-name 이런식으로 Instance가 생성됩니다. 그런데 사용자는 Node에 고유한 이름 즉, 예를 들면 wsi-node-front 이런식으로 확인하고 싶으시죠? 그렇기 때문에 자동으로 생성된 시작템플릿을 수정한다음 수정한 버전을 Nodegroup에 알려줘야합니다. 한번 가보시죠!!
1. 먼저 EC2 콘솔로 접근한 후 시작템플릿 창에 접근합니다.
2. 접근하면 Nodegroup하나당 2개에 시작템플릿을 확인하실 수 있습니다.

3. 하나는 관리형이고, 하나는 nodegroup를 정의해주는데 사용됩니다. 업데이트를 하려면 관리형이 아닌, “eksctl-wsi-eks-cluster~-nodegroup”에 시작템플릿을 수정해야합니다.
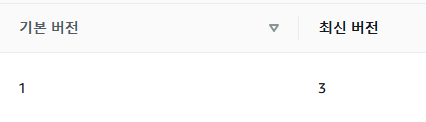
4. 수정 후 새로운 버전이 업데이트 된 것을 확인할 수 있습니다.
5. Bastion Instance에 접근 후 아래 명령을 실행하여 NodeGroup을 업데이트 합니다.
aws eks update-nodegroup-version \
        --cluster-name wsi-eks-cluster \
        --nodegroup-name wsi-manage-nodegroup  \
        --launch-template name=[시작 템플릿 이름],version=[시작템플릿 버전 지정]

#예시
aws eks update-nodegroup-version \
        --cluster-name wsi-eks-cluster \
        --nodegroup-name wsi-manage-nodegroup  \
--launch-template name=eksctl-wsi-eks-cluster-nodegroup-wsi-manage-nodegroup,version=26. 업데이트하고 있는 것을 확인합니다.

7. 업데이트가 완료되면 업데이트된 시작템플릿에 버전으로 모든 Node가 업데이트 됩니다. 즉, 전에 버전 Node는 삭제가 되고 새로운 버전에 Node가 생성됩니다.
- 전 버전에 인스턴스 종료됨

- 새로운 버전에 인스턴스 실행중

'2022년 전에 정리한 문서들' 카테고리의 다른 글
| EKS - Internet-facing ALB Node Objects(Front) - 1.22 Version (0) | 2022.08.24 |
|---|---|
| EKS - ALB Controller Create (0) | 2022.08.24 |
| EKS - Cluster and Nodegroups Create (CLI) (0) | 2022.08.24 |
| EKS - Cluster and Nodegroups Create (Console) (0) | 2022.08.24 |
| EKS - ECR(Docker Image) (0) | 2022.08.24 |