2022년 전에 정리한 문서들
EKS - Bastion Instance(Controller Instance)
반가운사람2
2022. 8. 24. 09:02
반응형
Cluster로 접근하기 위한 최소한에 권한은 아래 Policy를 사용하면 됩니다. 그러나 이번 실습에서는 따로 다루지 않습니다.
{
    "Version": "2012-10-17",
    "Statement": [
        {
            "Effect": "Allow",
            "Action": "sts:AssumeRole",
            "Resource": "arn:aws:iam::<<Account Number>>:role/EKS-Developer-Policy"
        },
        {
            "Effect": "Allow",
            "Action": [
                "eks:DescribeCluster",
                "eks:ListClusters"
            ],
            "Resource": "*"
        }
    ]
}
Bastion Instance Information
- Tag: Name: eks-2022-bastionInstance
- OS: Amazon Linux 2 AMI
- Instance Type: t3.small
- KeyPair: 할당
- Network Configuration
- Public Subnet
- 생성 후 탄력적 IP 할당
- Security Group: Inbound 22 Port and 443(EKS API Server 통신) Port outbound 443 Port and 80 Port 설정
- IAM Role: PowerUserAccess
- Userdata
#!/bin/bash
yum update -y
yum install docker -y
sudo systemctl --now enable docker.service
sed -i "s/PasswordAuthentication no/PasswordAuthentication yes/g" /etc/ssh/sshd_config
sed -i "s/#PermitRootLogin yes/PermitRootLogin yes/g" /etc/ssh/sshd_config
sed -i "s/#Port 22/Port 22/g" /etc/ssh/sshd_config
systemctl restart sshd.service
echo "Password" | passwd --stdin ec2-user
yum update -y
yum install -y jq
cd /home/ec2-user
curl "https://awscli.amazonaws.com/awscli-exe-linux-x86_64.zip" -o "awscliv2.zip"
unzip awscliv2.zip
sudo ./aws/install
cd /home/ec2-user
curl -o kubectl https://s3.us-west-2.amazonaws.com/amazon-eks/1.22.6/2022-03-09/bin/linux/amd64/kubectl
sudo chmod +x kubectl
mkdir -p $HOME/bin && cp ./kubectl $HOME/bin/kubectl && export PATH=$PATH:$HOME/bin
echo 'export PATH=$PATH:$HOME/bin' >> ~/.bashrc
curl --silent --location "https://github.com/weaveworks/eksctl/releases/latest/download/eksctl_$(uname -s)_amd64.tar.gz" | tar xz -C /tmp
sudo mv /tmp/eksctl /usr/local/bin
443 Inbound를 꼭 열어주어야합니다. Why? 즉, EKS Cluster에서 생성되는 API Server와 요청/ 응답을 주고 받을 수 있어야하기 때문입니다.
Bastion Command 접속 후 해야할 것
#기본 Region 설정
export AWS_REGION=$(curl -s 169.254.169.254/latest/dynamic/instance-identity/document | jq -r '.region')
echo "export AWS_REGION=${AWS_REGION}" | tee -a ~/.bash_profile
aws configure set default.region ${AWS_REGION}
#기본 Account ID 설정
export ACCOUNT_ID=$(curl -s 169.254.169.254/latest/dynamic/instance-identity/document | jq -r '.accountId')
echo "export ACCOUNT_ID=${ACCOUNT_ID}" | tee -a ~/.bash_profile
#메모리 부족으로 인한 피해를 받을 수 있기떄문에 늘려주겠습니다.
wget https://gist.githubusercontent.com/joozero/b48ee68e2174a4f1ead93aaf2b582090/raw/2dda79390a10328df66e5f6162846017c682bef5/resize.sh
sh resize.sh
aws configure -> 루트 계정으로 변환 -> 하는 이유는 이제 ROOT 계정으로 EKS를 생성했기때문입니다! 즉, ROOT 계정은 EKS 리소스에 접근 가능합니다.
#EKS Cluster kubeconfig 생성 -> 생성 후 ~/.kube/config 경로에 저장
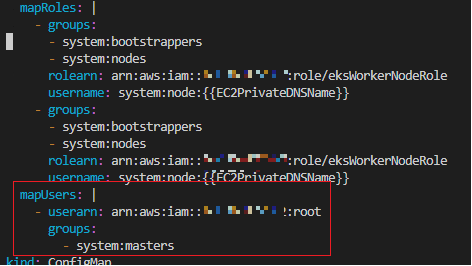
aws eks update-kubeconfig --region region-code --name cluster-nameBastion Instance로 aws configure 없이 생성했다면 ConfigMap 설정을 통해서 Root 계정 추가!
1. aws-auth 접근
kubectl edit cm/aws-auth -n kube-system2. 아래 표시한 부분을 추가합니다. (모자이크 부분은 Account ID 입니다.)
3. 그럼 이제 Console에서 EKS에 대해서 Root 계정으로 확인이 가능합니다.

반응형